Blog

  • GTD – Getting Things Done

    The method that I use to organize all the tasks in my professional and personal life.

    Based on the David Allen’s book: Getting Things Done

    Getting Things Done (GTD) is a personal productivity system developed by David Allen and published in a book of the same name. GTD is described as a time management system. Allen states “there is an inverse relationship between things on your mind and those things getting done”.[3][a]

    The GTD method rests on the idea of moving all items of interest, relevant information, issues, tasks and projects out of one’s mind by recording them externally and then breaking them into actionable work items with known time limits. This allows one’s attention to focus on taking action on each task listed in an external record, instead of recalling them intuitively.

    Source: https://en.wikipedia.org/wiki/Getting_Things_Done

    It sounds complicated, but it’s quite simple.

    The David Allen’s method consists of writing every task, idea, thought, responsibility and every brainwave into an organized list.

    The essential steps are:

    1. Write each idea to the “Inbox list”
    2. Then, move them one by one to:
      • It’s project. For example:
        • The task “pay the car insurance” goes to “Car” project,
        • The task “water the cactus” goes to “House” project
      • or to “Incubation” (the place where the ideas that do not require immediate action). For example:
        • Travel to Las Vegas on some time in the future,
        • Buy a sport car (maybe, I don’t know if I will do it).

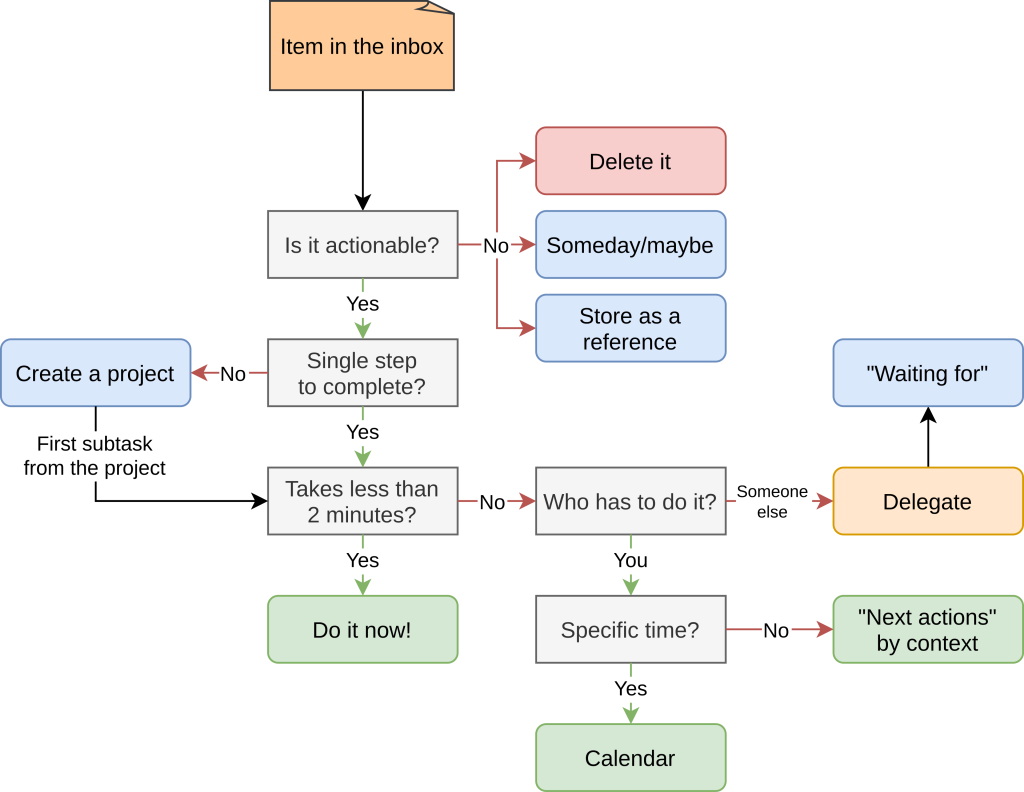
    The full workflow

    This way, you can liberate your brain and your biological RAM from unnecessary bloat. Otherwise, each idea, each task and each duty will reside in your head and will cause unnecessary stress. If you know that each task is written in a place that you can trust, you can forget about them.

    The place you can trust

    David Allen says that a piece of paper is enough to apply his method. He is right, however, the modern technology gives you an opportunity to get the most out of this method.

    The most popular tool is https://www.todoist.com

    However, the tool I use for my professional and personal life is https://ticktick.com

    It’s cheaper and it has more functionalities.

  • Playing with /etc/hosts by Ansible

    dnsmasq is a better solution for this purpose, but the goal is to play with Ansible.

    It’s the continuation of the post: My own VPN on a VPS

    The main goal is to play with Ansible. The second goal is to be able to connect to the hosts by their names rather then by their IPs. For this purpose, I will update /etc/hosts file on each host automatically by Ansible.

    Preparing the host files on the Ansible server

    In first place, I edit the hosts file on Ansible:

    [root@vps-dc91297d ~]# tail -n3 /etc/hosts 
    10.8.0.1 vps
    10.8.0.2 komputer01
    10.8.0.3 pi

    Now, I will be able to use the hosts name in the Ansible configuration file.

    Ansible installation

  • My own VPN on a VPS

    Why?

    As described in the Privacy Project, I use my own Domain Name Server. It works great in the local network, but I am not able to access it from outside.

    That’s why I need my own VPN server.

    Other possible solutions

    Port Forwarding on my home router – impossible, because I don’t have access to the admin’s configuration. Besides, I don’t have static IP. There are solutions like Dynamic DNS, but they are not reliable on the long run,

    Tailscale (or other similar commercial solution) – it would work, but it’s not so much fun.

    The VPN server configuration

    The configuration is simple:

    [root@vps-dc91297d fedora]# cat /etc/wireguard/wg0.conf 
    [Interface]
    Address = 10.8.0.1/24
    ListenPort = 51820
    PrivateKey = (redacted)
    
    PostUp = firewall-cmd --direct --add-rule ipv4 filter FORWARD 0 -i wg0 -j ACCEPT
    PostDown = firewall-cmd --direct --remove-rule ipv4 filter FORWARD 0 -i wg0 -j ACCEPT
    
    # Example peer (add one per client)
    [Peer]
    PublicKey = (redacted)
    AllowedIPs = 10.8.0.2/32
    
    [Peer]
    PublicKey = (redacted)
    AllowedIPs = 10.8.0.3/32

    The VPN Clients’ configuration

    root@komputer01:/etc/wireguard# cat wg0.conf 
    [Interface]
    PrivateKey = (redacted)
    Address = 10.8.0.3/24
    
    [Peer]
    PublicKey = (redacted) 
    Endpoint = vpn.tomasz-avila.pl:51820
    AllowedIPs = 10.8.0.0/24   # route all VPN traffic through the server
    PersistentKeepalive = 25

    The results

    [root@vps-dc91297d fedora]# wg show
    interface: wg0
      public key: (redacted)
      private key: (hidden)
      listening port: 51820
    
    peer: c2dz9nLrd7bYfyTFj7fMQHBMkHaIz7GFoH1bRK+ermY=
      endpoint: 46.205.194.178:60080
      allowed ips: 10.8.0.3/32
      latest handshake: 15 seconds ago
      transfer: 10.89 MiB received, 3.80 MiB sent
    
    peer: XoOt5kWRfvUSFf8I+SGUHcDcC9TeNloifDspq9uw0BI=
      endpoint: 185.246.208.88:39392
      allowed ips: 10.8.0.2/32
      latest handshake: 1 minute, 5 seconds ago
      transfer: 4.07 MiB received, 11.15 MiB sent

    Now, I am able to connect to all my devices from all around the world.

  • Privacy Project

    Why does it matters?

    Why does it matters paragraph

    Web Browser: Librewolf

    Paragraph

    Custom DNS on Raspberry PI

    Paragraph

    Private notes: Joplin

    Paragraph

    Private files: Cryptomator

    Paragraph

    Accessing DNS from outside LAN

    I will describe it in the following article:

  • Hello world!

    Welcome to WordPress. This is your first post. Edit or delete it, then start writing!